How to Export Your Microsoft Money File and Actually Keep Your History
By Ian, founder of ThriftyOwl.money
If you have a Microsoft Money file sitting on an old drive, you probably already know the uncomfortable part: the file you care about, usually called My Money.mny, can't be opened by anything except Money itself. It isn't a spreadsheet, it isn't a text file, and no modern finance app reads it directly. Microsoft ended support for Money in 2011, so nobody is coming to add an "open .mny" button.
The good news is that Money can still write its data out in a format other software understands, and that route has been the standard escape hatch for years. The bad news is that it is easy to do it halfway: export only a few accounts, forget the closed ones, or find out a year later that some history didn't make it. This guide walks through doing it properly, so that the decade or two of records you spent time entering are still there when you're done.
Why can't you just open a .mny file?
Because a .mny file is Money's own proprietary database, in a format that was never published. It holds everything in one place: accounts, transactions, payees, categories, bills, budgets, and the rest. Other programs would need to understand that internal format, and it was never published. Money Plus Sunset, the free final edition Microsoft released in 2010, can still open and edit these files, but that's the only program that can.
That's why every migration guide ends up in the same place: get Money to export your data into a format that was designed to be shared. For Money, that format is QIF (Quicken Interchange Format), a plain-text file that lists transactions one after another. It's old and it has quirks, but it is understood by almost everything, and it carries the things that matter most: dates, amounts, payees, categories, memos, cheque numbers, split transactions, and transfers between accounts.
What do you need before you export from Money?
You need a working copy of Money to do the export. If you still have a computer where Money or Sunset opens your file, use that. If you have only the file, install Money Plus Sunset on a Windows machine and open your file through File → Open. Money data files are normally in your Documents folder, with the main file named My Money.mny unless you chose a different name, and Money's .mbf files are its backups.
Before you touch anything, copy the .mny file somewhere safe, along with any .mbf backups. Exporting doesn't change your data, but you want an untouched original in case you ever need to go back and export again. If your file is large, give Money a minute or two to finish opening before you start.
Two things are worth doing inside Money before the export:
- Re-open any closed accounts you want to keep. Money won't export an account you've closed, so a savings account from 2009 that you closed years ago will be silently missing from your export unless you re-open it first. You can close it again afterwards.
- Make a list of your accounts. Write down every account in Money, closed ones included, and how many years of history each one has. You'll use this list to check the import at the end.
Step 1: How do you export an account as a Loose QIF file?
Open each account in Money, choose File → Export, and pick Loose QIF. Money exports one account at a time. There is no "export everything" button, so you repeat the steps below for every account you want to bring across.
- Open the account you want to export, or choose it when asked.
- Choose File → Export.
- Choose the Loose QIF format. Money offers more than one QIF flavour, and Loose QIF is the one ThriftyOwl.money's importer is built around.
- Name the file after the account, such as
Current Account.qiforVisa.qif, and save it into one new, empty folder.
Name the files clearly. When you're importing a dozen accounts later, "Barclays joint current.qif" is much easier to recognise than "Export3.qif".
Step 2: How do you put the QIF files in one archive?
Select all the .qif files and compress them into a single .zip. When you've exported every account, you'll have a folder full of .qif files, one per account. Select just those files and compress them into a single .zip file. (ThriftyOwl.money also accepts .rar, if that's what your archiver produces.)
Make sure the archive holds only the QIF files. Don't include your original .mny file, any backups, or old documents that happened to be in the folder. A clean archive is easier to check, and it keeps the upload small.
Step 3: How do you import the archive?
Upload it under Account Settings → Import Microsoft Money. In ThriftyOwl.money, open Account Settings → Import Microsoft Money. The page repeats the export steps from this guide, and has an upload area for the archive.
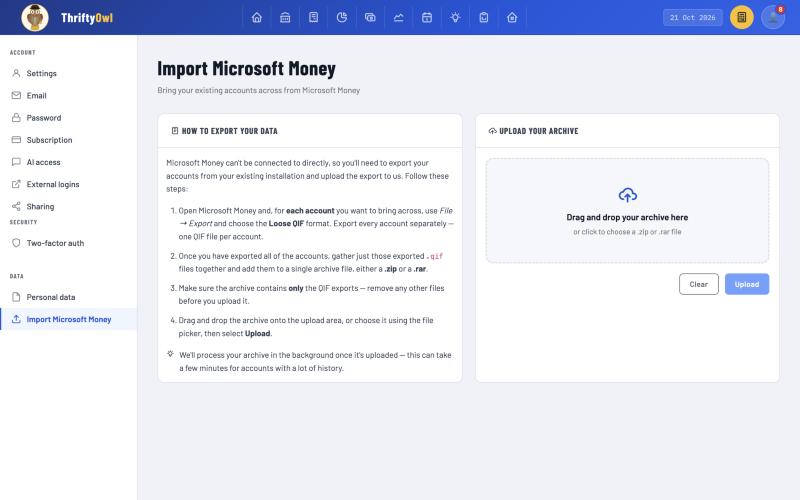
Drag the archive onto the upload area, or click it to choose the file, then select Upload. The import runs in the background, and it shows its progress as it reads each file. Accounts with a lot of history can take a few minutes.
When the files have been read, ThriftyOwl.money doesn't import everything blindly. It stops and lists every account it found, with the number of transactions in each, and lets you choose what to bring across:
- Tick the accounts you want, or use Select all.
- Check the account type for each one (bank, savings, credit card, or loan), because a QIF file doesn't always say, and the right type affects how the account behaves.
- Mark your everyday accounts as favourites, so they're easy to reach.
Accounts with no transactions aren't listed. If you transfer money to an account you choose not to import, the transfer is kept as an ordinary transaction and labelled with the other account's name, so your records stay balanced on the side you did import. Select Import selected accounts and you're done.
What carries over from Money, and what doesn't?
Transactions carry over well, and most of what surrounds them does not. QIF is a transaction format, so it's good at transactions and weak at everything else. It helps to know the difference before you start, so there are no surprises.
What comes across:
- Every transaction's date, amount, payee, and memo
- Cheque numbers
- Categories, including sub-categories
- Split transactions, with each part keeping its own category and memo
- Transfers between your accounts
- Cleared and reconciled status, so your reconciliation history isn't lost
What doesn't, and why:
- Bills and recurring payments. QIF doesn't describe scheduled items, so you'll set up your regular bills again. It's a good moment to throw out the ones that no longer apply.
- Budgets and reports. These are Money's own settings, not transactions. Rebuild them in the new app, using your imported history to see what you actually spend.
- Attachments and home inventory. These aren't part of the QIF format.
- Closed accounts you didn't re-open. As noted above, Money won't export these.
There are a few known limits on Money's side of the export, too. Money replaces unusual characters with #, shortens long category names, and exports voided transactions with a zero amount. Money also keeps only the first categorisation on some transactions, so check any that were categorised in more than one way. These come from third-party guides to Money's exporter, not from Microsoft's own documentation, which no longer exists for this version, so they are things to check rather than certainties.
Step 4: How do you check your history before you trust it?
Compare the imported accounts against the list you made earlier. Don't assume the import worked. Spend ten minutes checking it against the list you made earlier, because it's far easier to fix a problem now, while the original file is still on your desk, than in two years.
- Account balances. Compare each account's balance with the same date in Money. If the totals agree, it's almost certain that every transaction made it across.
- Transaction counts. The import screen shows how many transactions it found in each account. Compare those with what Money reports.
- Oldest and newest dates. Scroll to the beginning and the end of a few accounts and check that the first and last transactions match.
- A few spot checks. Pick a split transaction, a transfer, and a cheque payment, and look at each one. If those three look right, the rest almost always do.
- Categories. Look at your category list. Money's categories were often built up over many years, so it's normal to find duplicates and old names. Tidy them while you're there.
If something doesn't match, the usual cause is an account that wasn't re-opened before export, or a file that wasn't included in the archive. Fix that in Money, export the missing account again, and import it.
What traps should you avoid?
Exporting before the file is tidy. If your Money file has uncategorised transactions or duplicate payees, those will come across as they are. It's tempting to clean them up first, but it's usually better to import first and tidy afterwards, because the new app makes bulk changes much easier than Money did.
Throwing away the old file. Keep the original .mny file and the QIF exports indefinitely. They take up almost no space, and they are your insurance if you ever want to re-import, or check what a figure was.
Doing it all in one go. If you have a dozen or more accounts, it's fine to start with the three or four you use every day and add the rest later. The free plan limits how many accounts you can import, so starting with your most important ones is sensible anyway.
The short version
- Copy your
.mnyfile somewhere safe. - Re-open any closed accounts you want to keep.
- In Money, use File → Export → Loose QIF for each account, one file each.
- Put just the
.qiffiles into one .zip. - Upload it in ThriftyOwl.money under Import Microsoft Money, choose your accounts, and import.
- Check balances and dates against Money before you rely on it.
That's all there is to it. The format is old, but it's good enough that decades of records can move across without being retyped, and once they're in, they live somewhere that won't be switched off the way Money was.
Not everything lives in Money. If some of your records are in a spreadsheet or a bank export, ThriftyOwl.money imports those too, as CSV files or Excel workbooks, from Account Settings → Import CSV and Import Excel. Moving from a spreadsheet covers how that works.
If you'd like to try it, you can start with ThriftyOwl.money, and the import page is waiting under Account Settings. If you're still deciding whether a move is worth it, what happened to Microsoft Money, and what to use now covers the background.
About the author: Ian is the founder of ThriftyOwl.money. He built its Microsoft Money, CSV and Excel import tools himself and writes ThriftyOwl's white papers on the personal finance software industry.
Sources: Infinite Kind, "Importing From Microsoft Money"; ItStillWorks, "How to Export Files From Microsoft Money"; Eleven Forum, "MS Money Sunset Pro" (data file locations and .mbf backups).